Search Results
60 results found with an empty search
- An Autumn Feature I’ll Always Treasure: ArtyPax Ceramics in Mollie Makes
Autumn has always been one of my biggest sources of inspiration, so being featured in Mollie Makes Magazine (October 2022 issue) felt incredibly special (my first magazine feature). My autumn ceramics —including barn owls, mushrooms, wolves, and skulls —were included as part of their autumn gift article , and it’s a moment I still look back on with a huge sense of pride. Ceramics Inspired by the Turning Season These pieces came from my appreciation of the slower, darker months—the shift in light, the earthy tones, and the quiet magic that autumn brings. The barn owls inspire dusk walks and the stillness of countryside evenings. The mushrooms celebrate woodland textures and the beauty of small, overlooked details. The wolves carry a sense of wildness and folklore. The skulls feel natural and organic rather than macabre—quiet nods to the cycle of life. Each piece was cast slowly by hand, with natural finishes and textures that echo the season rather than shout about it. Why Being Featured in Mollie Makes Meant So Much Mollie Makes is one of the UK’s most influential creative magazines, loved for championing independent makers, original design and thoughtful handmade work. It’s a publication that genuinely supports small businesses and celebrates creativity in all its forms. To have my work selected for their autumn gift feature felt like a real vote of confidence. It placed ArtyPax alongside other carefully curated, creative brands and introduced my ceramics to readers who truly appreciate craftsmanship, storytelling, and seasonal living. A Moment of Real Gratitude Being featured in Mollie Makes feels like a genuinely special milestone for ArtyPax. Seeing my autumn ceramics included in a magazine I’ve long admired is both surreal and deeply encouraging. It’s a reminder that slow, seasonal work—made with care and intention—has its place and its audience. I’m incredibly grateful to the Mollie Makes team for including my work and to everyone who supports ArtyPax in big and small ways. Knowing these pieces have connected with readers who value creativity, craftsmanship, and autumn’s quiet magic makes this feature even more meaningful.
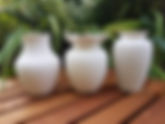
- A Lovely Little Milestone: My Vase Trio Featured in The Lady
I still remember the moment I saw it in print. There, nestled within the pages of The Lady (1st Nov–5th Dec 2024 issue), was my vase trio, my humble business, ArtyPax —the shouldered vase, the wavy-rimmed vase, and the tall neck vase. One of those quiet-but-huge moments that makes you stop, smile, and think, yes… this is why I do this . A Trio Designed to Be Lived With This vase trio is designed to feel calm, timeless and quietly expressive—pieces that don’t shout for attention but gently earn it. The shouldered vase is grounded and reassuring, perfect for fuller stems or dried arrangements. The wavy-rimmed vase brings movement and softness, inspired by natural rhythms and imperfect beauty. The tall neck vase is elegant and understated, made to hold a single stem just as confidently as a small bouquet. Together, they’re meant to work as a set or shine individually—styled on shelves, tables, or windowsills, becoming part of everyday life rather than something kept “just for best”. Why Being Featured in The Lady Means So Much The Lady is one of the UK’s longest-established magazines, renowned for its thoughtful editorial, timeless style and celebration of quality craftsmanship - values that sit right at the heart of ArtyPax. With a loyal readership that values tradition, longevity and well-made pieces, being featured in its pages feels like a meaningful endorsement of slow, considered design, especially as a small UK business built slowly and intentionally. This wasn’t about trends or quick wins. It was about objects made with care, designed to last, and chosen because they resonate. That recognition means more than I can easily put into words. A Quiet Thank You I’m so grateful to be featured in The Lady & for them including my work. To everyone who has supported ArtyPax—whether you’ve purchased a piece, shared my work, or simply followed along. Moments like this don’t happen in isolation; they’re built on years of making, refining, and believing in slow, meaningful creativity. If you’ve welcomed one of these vases into your home, know that it started life as a sketch, became clay and ended up somewhere I never quite imagined—on the pages of a magazine I’ve long admired. And honestly? That feels pretty special.
- A Coastal Dream Come True: My Puffin Ceramic Featured in Coast
Some moments stop you in your tracks—and this was one of them. Featured in Coast magazine (December 2024 issue) was my puffin ceramic and I’m still quietly buzzing about it. A Puffin Inspired by the British Coast The puffin has always felt like such a joyful symbol of the UK coastline—characterful, resilient and unmistakably iconic. With this piece, it captures that gentle charm without overworking it. Simple forms, soft detailing and a calm presence that feels at home on a shelf, windowsill, or tucked among other treasured objects. Like all my pieces at ArtyPax, this puffin began as a quiet idea, created by hand, with nature firmly at its heart. Seeing it celebrated in a magazine that shares that same love of the coast felt like a perfect meeting point. Why Being Featured in Coast Is Such an Honour Coast is one of the UK’s most well-loved lifestyle magazines, known for its beautiful photography, thoughtful writing and deep connection to coastal living. It’s a publication that reaches readers who truly value craftsmanship, storytelling, and the natural world—people who notice the details and care about where things come from. To have my pottery included in their December issue, a time when homes feel especially reflective and meaningful, was incredibly affirming. It felt like a nod not just to one piece, but to the slower, more intentional way ArtyPax is built. Gratitude, Always I’m so grateful to the team at Coast for featuring my puffin ceramic and to everyone who continues to support my work—whether by collecting a piece, sharing my journey, or simply cheering me on from afar. Moments like this remind me why I do what I do: to be creatively inspired by nature in a way that carries a sense of place, calm and quiet joy. And knowing this little puffin found its way into the pages of Coast ? That’s something I’ll treasure for a long time.
- As Seen in BBC Gardeners’ World: A Pinch-Me Moment for My Gonk Ceramics
I’m still grinning as I write this. Late nights in the studio, ceramic dust under my fingernails, sketchbooks filled with half-formed ideas—and then this happened: my puppy gonk and kitten gonk ceramics were featured in the November 2024 issue of BBC Gardeners’ World Magazine , followed by my garden gnome in their December 2024 issue. For a small UK business selling nature-inspired, paint your own ceramic kits , this was one of those “stop everything and breathe” moments. How My Puppy & Kitten Gonks Caught Their Eye (November 2024) The puppy and kitten gonks were born from a simple idea: bring warmth, whimsy and a little woodland magic into creative time at home . Each piece is designed to feel friendly and characterful—something you can paint your own way, then proudly display on a shelf, windowsill, or potting bench. Seeing them celebrated in Gardeners’ World felt surreal. The November issue leans into cosy creativity as the garden quiets for winter and my gonks fit right in—inviting crafters, families and mindful makers to slow down and enjoy a hands-on moment. Our Garden Gnome’s December Spotlight Just when I thought the excitement had peaked, December arrived—with my garden gnome featured in the festive issue. This piece is a love letter to classic garden folklore, reimagined for modern makers. It’s sturdy, cheerful and intentionally blank—ready for traditional reds and greens, earthy neutrals, or something totally unexpected. Being included in the December issue felt especially meaningful. It’s a time when homes fill with handmade touches and creativity becomes a way to connect. Knowing my gnome might be painted at kitchen tables across the UK? That’s the real win. Why This BBC Gardeners' World Feature Means So Much BBC Gardeners’ World Magazine is one of the UK’s most trusted and widely read gardening publications, inspiring millions of readers with its focus on creativity, nature, and outdoor living. Being featured twice, across two consecutive issues in the magazine, is a real honour, placing my work alongside ideas and products chosen for their quality, originality, and connection to the natural world. It’s also a reminder that small businesses can grow from quiet ideas into something seen and shared. If you’ve ever picked up one of my kits, gifted one, or painted alongside someone you love—this moment belongs to you too. Fancy Painting Your Own? My puppy gonk , kitten gonk and garden gnome kits are available to order online across the UK. Each kit is designed to be relaxing, beginner-friendly and joy-sparking—perfect for mindful evenings, rainy afternoons, or thoughtful gifts. Thank you for being part of my story. And thank you, Gardeners’ World , for helping these little clay characters find their way into the spotlight.
- A Moment That Truly Took Flight: My Kingfisher Ceramic Featured in Waterways World
There are some features that feel especially meaningful—and this was one of them. I was absolutely thrilled to see my kingfisher ceramic featured in Waterways World January 2025 magazine issue . As someone endlessly inspired by British wildlife and the quiet beauty of nature, this felt like a perfect home for the piece. Inspired by Still Water and Sudden Colour The kingfisher has always fascinated me. That flash of blue, the stillness before movement, the way it belongs so completely to rivers and waterways—it’s a bird that rewards patience and observation. This ceramic captures that sense of calm and quiet wonder with natural detail. Like all of the pottery at ArtyPax, it was cast slowly by hand, with soft forms and a focus on feeling over perfection. It’s a piece intended to sit peacefully in a home, echoing the calm of waterside walks and moments spent watching nature simply be. Why Being Featured in Waterways World Means So Much Waterways World is a long-established and highly respected magazine, read by people who genuinely live and breathe Britain’s canals, rivers, and waterways. It’s known for its knowledgeable editorial, loyal readership, and deep appreciation for the landscapes and wildlife that surround our inland waters. To have my kingfisher ceramic featured in their January issue felt like a real endorsement—not just of the piece itself, but of the values behind my work. It connected ArtyPax with an audience that understands slow living, close observation and the importance of protecting and celebrating our natural environment. A Quietly Proud Moment I’m incredibly grateful to the team at Waterways World for featuring my pottery and to everyone who continues to support ArtyPax in big and small ways. These moments always remind me that thoughtful, nature-led design can find its place—and its people. If you’ve spotted a real kingfisher along a riverbank, you’ll know how special that moment feels. Knowing my ceramic version found its way into the pages of Waterways World feels just as memorable.
- A Spooky-Season Highlight: My Pumpkin Ceramics Featured by Confidentials
Autumn has always been a special season for me creatively, so seeing my natural-looking pumpkin ceramics from ArtyPax featured by Confidentials, on their website, in September 2025 felt particularly fitting. They were included as part of Confidentials’ Halloween gift guide , and I couldn’t have asked for a better place—or time—for them to appear. Pumpkins Inspired by Nature, Not Novelty When I design pumpkins, I always steer away from anything overly gimmicky. I’m drawn instead to real pumpkins —their subtle colour shifts, gentle ribbing, and organic imperfections. These ceramics were made to feel tactile and timeless, so they can sit happily in a home throughout autumn, not just on Halloween night. Each piece is made carefully by hand, with natural tones and soft textures that echo the changing season. Being included in a Halloween gift guide that values thoughtful, design-led finds felt like a wonderful alignment. Why being Featured by Confidentials Matters Confidentials is a well-established and highly respected UK lifestyle website, known for its curated coverage of culture, shopping, food, and independent businesses. With a loyal readership—particularly across the North of England—it’s a platform people genuinely trust for recommendations. To have my pottery selected for their Halloween gift guide felt like a real endorsement. It placed my pumpkins alongside other carefully chosen, creative pieces and introduced ArtyPax to readers who appreciate originality and craftsmanship over mass-produced décor. A Proud Seasonal Moment Features like this always make me pause and reflect. What began as a quiet idea—sketched during an autumn afternoon—ended up reaching a much wider audience through a publication I’ve admired for years. I’m incredibly grateful to the Confidentials team for including my pottery, and to everyone who continues to support ArtyPax. If one of these pumpkins ends up on your table, mantel or windowsill this autumn, I hope it brings a little of that slow, seasonal joy into your home. Read the Confidentials Manchester Halloween Gift Guide , Confidentials Liverpool Halloween Gift Guide and the Confidentials Leeds Halloween Gift Guide .
- A Proud Interiors Moment: My Textured Vase Trio Featured in Your Home
Seeing my work featured in a interiors magazine always stops me in my tracks—but this one felt especially special. I was absolutely delighted to find my ceramic textured vase trio featured in Your Home Magazine ( February 2026 issue ). It was one of those quiet, affirming moments that made all the sketching, planning and refining feel truly worthwhile. A Trio Rooted in Texture and Calm This vase trio is designed with touch and subtlety in mind. Each piece feels grounding and tactile—objects that invite you to slow down and really notice them. The gentle textures are inspired by natural surfaces: weathered stone, soft earth and organic patterns found outdoors. Finished in calm, neutral tones, the vases are intended to work beautifully together as a set, while still holding their own when styled individually. They’re pieces made to live easily in a home—on shelves, tables, or windowsills—bringing a sense of balance rather than demanding attention. Why Being Featured in Your Home Means So Much Your Home is a long-established and widely read UK interiors magazine, known for making good design feel accessible, welcoming and achievable. It’s a publication people trust for inspiration—showing how thoughtful pieces can elevate everyday spaces without feeling out of reach. To have my pottery featured in their February 2026 issue felt like a meaningful endorsement of ArtyPax’s approach: slow, nature-inspired design with longevity at its core. It introduced my ceramics to readers who genuinely care about creating calm, personal interiors—and that alignment means everything to me. A Moment of Gratitude I’m incredibly grateful to the Your Home team for featuring my vase trio and to everyone who supports ArtyPax—whether by collecting a piece, recommending my work or simply following along behind the scenes. What began as a simple ceramic set has found its way into the pages of a national interiors magazine, and that’s something I’ll always be proud of. If this vase set ends up in your home, I hope it brings a sense of quiet beauty and everyday ease to your space.
- A Festive Honour: My Fox Ceramic Featured in Simply Christmas
Christmas has a way of making creative milestones feel even more magical—and this one truly did. I was absolutely delighted to see my fox ceramic from ArtyPax featured in Simply Christmas (the Xmas 2025 issue) . It’s one of those moments where you pause, take it in and feel incredibly grateful. A Fox with a Festive Spirit The fox has always been one of my favourite animals to work with—curious, elegant and quietly expressive. I wanted this ceramic piece to feel rooted in nature rather than overtly festive. Something that could sit comfortably among Christmas decorations in December, but still feel at home on a shelf or windowsill all year round. Soft forms, natural tones and a calm presence were key. It’s a piece designed for people who love woodland-inspired décor and prefer Christmas styling that feels thoughtful and timeless rather than novelty-led. Why Being Featured in Simply Christmas Means So Much Simply Christmas is a much-loved UK magazine dedicated entirely to the festive season—from decorating and gifting to cosy interiors and creative inspiration. It’s a publication readers return to year after year, trusting it for beautifully curated ideas that make Christmas feel special. To have my fox ceramic included in their Christmas 2025 issue felt like a real seal of approval. It placed my pottery in front of an audience who genuinely value craftsmanship, atmosphere, and meaningful seasonal décor—exactly the people I create for at ArtyPax. A Moment to Be Thankful For I’m incredibly thankful to the team at Simply Christmas for featuring my work, and to everyone who supports ArtyPax—whether by collecting a piece, sharing my journey or simply following along. Seeing a small, hand-cast ceramic make its way into a national Christmas magazine is something I’ll always treasure. If this little fox finds its way into your home during the festive season, I hope it brings a sense of calm, warmth and a touch of woodland magic to your Christmas.
- A Valentine’s Feature to Cherish: My Ceramic Love Birds on LDN
February is always a month full of feeling, so seeing my ceramic love birds featured on LDN ( London Daily News) website in February 2026 —as part of their Valentine’s gift article—felt genuinely heartwarming. My round love bird and crested whittle-style love bird were included as thoughtful, design-led gift ideas and I couldn’t have asked for a better context for them to appear. Love Birds Made to Be Given (and Kept) These love birds were designed to feel symbolic without being overly literal. To express connection, companionship and affection in a quiet, timeless way—pieces that feel meaningful whether they’re given as a romantic gift, a wedding keepsake or a small token of love. The round love bird is soft and grounding, while the crested whittle-style bird has a little more character and movement. Both are cast slowly by hand, with natural forms and whittled effect finishes that let their personality come through without fuss. They’re pieces made to sit side by side—on shelves, bedside tables, or mantelpieces—growing into part of a home’s story. Why Being Featured on LDN Is So Special LDN (London Daily News) is a well-known and widely read digital news platform, covering everything from lifestyle and culture to shopping and seasonal features. Their gift guides reach a broad UK audience looking for thoughtful, well-curated recommendations beyond the obvious high-street options. Being included in their Valentine’s article felt like a real endorsement—not just of the love birds themselves, but of slow-made, meaningful gifting. It introduced ArtyPax to new readers who value originality, craftsmanship and gifts that feel personal rather than disposable. A Feature I’ll Always Remember I’m incredibly grateful to the LDN team for featuring my work, and to everyone who continues to support ArtyPax in so many ways. Moments like this remind me that small, hand-crafted pieces can still make their way into big conversations—especially when they’re rooted in emotion and care. If one of these love birds ends up being gifted this Valentine’s Day (or any day, really), I hope it becomes something quietly treasured—just as this feature will be for me.
- Officially Licensed Paddington Kit Featured in The Independent’s IndyBest!
I'm absolutely thrilled to share some exciting news… ArtyPax has officially been featured in * The * Independent’s IndyBest gift guide! 🎉🐻 My officially licensed Paint Your Own Paddington Ceramic Kit has been ranked number 5 out of 16 in The Independent’s “Best Gifts for 4-Year-Olds” — a huge honour and an incredible milestone for my small UK business. To be recognised by IndyBest, one of the UK’s most trusted product review platforms, is something I'm beyond proud of… and I couldn’t wait to tell you all about it! ⭐ “A lovely, hands-on activity” — What IndyBest said about our Paddington kit Here’s an excerpt from the review in The Independent : “This officially licensed Paint Your Own Paddington kit is a lovely, hands-on activity for children who love to make and create. It comes complete with Paddington’s iconic hat and duffel coat, along with six paints, a brush, and easy-to-follow instructions. Our tester loved the quiet concentration of painting ‘their Paddington’ – and it’s now sitting proudly on my desk. It’s the kind of activity that feels special in the moment and meaningful afterwards. There’s no extra firing needed, just paint together, let it dry and proudly display.” I couldn’t have said it better myself. That special-in-the-moment feeling is exactly why ArtyPax exists. 🐻 Why this feature means so much As a small UK business specialising in nature-inspired and officially licensed paint-your-own ceramic kits , being acknowledged by a national publication like The Independent is a huge achievement. IndyBest is known for its rigorous testing, honest reviews, and high standards — so being included in their roundup (and in the top five!) is something I'm incredibly proud of. It also means: More families discovering mindful, screen-free crafting More children experiencing creative confidence More adults rediscovering the joy of painting with a beloved character And a spotlight on a product that is genuinely meaningful, relaxing, and fun For me, this recognition is not just an award — it’s a moment of celebration for the whole ArtyPax community. Just look at these glorious bears painted by you! 🎨 Why Paddington is perfect for all ages (not just 4-year-olds!) Although the feature was focused on children’s gifts, my Paddington kit is suitable for anyone aged 3 and up — and I mean anyone . Whether you’re: A parent painting alongside your child A Paddington super-fan A collector of officially licensed memorabilia Or an adult looking for mindful creative time… …this kit is a wholesome, heart-warming craft experience for all ages. There’s no kiln needed, no complicated steps, and no artistic pressure — just pure, relaxing creativity. 🎁 A perfect gift that feels meaningful long after the painting stops The IndyBest tester loved that moment of calm concentration — and how the finished painted Paddington became a proudly displayed keepsake. That’s the magic of paint-your-own ceramics: They’re engaging in the moment They’re calming and mindful And they leave you with something meaningful to keep Pair that with an iconic British character, and you’ve got a gift that truly means something . 🌟 Thank you for helping us reach this milestone I wouldn’t be celebrating this achievement without my wonderful customers who support ArtyPax, share your creations, and recommend my kits to friends and family. Moments like this are a reminder of why I do what I do — creating mindful, nature-inspired, family-friendly crafts that bring joy, creativity, and connection into people’s homes. And being recognised by The Independent ’s IndyBest? Well… that’s the marmalade on top. 🍊🐻✨ 🛍️ Ready to paint your own Paddington? My officially licensed Paint Your Own Paddington Kit is available on the ArtyPax website. Whether you’re choosing a thoughtful gift, planning a creative afternoon with the kids, or treating yourself to a mindful moment… Paddington is ready to be painted, cherished, and proudly displayed. 🌍 Discover More About ArtyPax At ArtyPax, we believe in the power of creativity. Each kit is designed to inspire imagination and foster creativity. Our products are not just about painting; they are about creating memories and experiences that last a lifetime. 🎨 The Benefits of Creative Activities Engaging in creative activities has numerous benefits. It can reduce stress, improve focus, and enhance overall well-being. Whether you are painting with your children or enjoying some quiet time alone, the act of creating can be incredibly fulfilling. 🐻 Paddington: A Timeless Character Paddington Bear has been a beloved character for generations. His adventures and charm resonate with both children and adults. By incorporating Paddington into our kits, we aim to bring joy and nostalgia to every painting experience. 🎁 Perfect for Any Occasion Our Paint Your Own Paddington Kit makes an excellent gift for birthdays, holidays, or just because. It’s a thoughtful way to encourage creativity and provide a fun activity for families to enjoy together. 🌟 Join the ArtyPax Community We invite you to join our growing community of artists and creators. Share your painted Paddington creations with us on social media. Your artwork could inspire others and become part of our gallery! See the Independent's review below or read the review on IndyBest
- Beat the January Blues with Mindful Pottery Painting at Home (No Kiln Needed)
Beat the January Blues with Mindful Pottery Painting at Home Why paint-your-own ceramics are one of the most popular mindfulness activities in the UK right now: January can be a tough month in the UK. The festive buzz has faded, the evenings are still dark, and many of us are feeling tired, overstimulated, or simply in need of something uplifting. It’s no surprise that January is one of the most searched months for mindfulness activities, self-care ideas and relaxing hobbies . And one creative activity continues to rise to the top: painting pottery at home . At ArtyPax , I see it every year — January is when people turn to creativity not just for fun, but for wellbeing. Why Pottery Painting Is Perfect for January Pottery painting offers something many of us are craving this time of year: Calm Focus A break from screens A sense of achievement When you paint a ceramic figure or bowl, your attention naturally settles on the brushstrokes, colours and textures. This gentle focus helps quiet busy thoughts and brings you into the present moment — a key principle of mindfulness. That’s why pottery painting is now recognised as one of the most accessible mindfulness activities in the UK , especially for people who struggle with traditional meditation. A Screen-Free Self-Care Activity You Can Do at Home Painted by ArtyPax Customer Suzanne D. Unlike many hobbies, painting ceramics doesn’t require: A studio A kiln Prior artistic experience ArtyPax paint your own pottery kits are designed to be painted with acrylic paints , meaning you can enjoy the full creative experience at home. Simply paint, let it dry, seal if you wish and display. In January, when evenings are long and energy is low, this kind of slow, screen-free activity is incredibly beneficial for mental wellbeing. Creativity That Supports Mental Health Research consistently shows that creative activities can: Reduce stress and anxiety Improve mood Encourage relaxation Increase feelings of accomplishment Many of my customers share how painting pottery helps them: Switch off after work Cope with winter stress Feel calmer and more grounded Replace scrolling with something meaningful It’s self-care — but without pressure or perfection. Nature-Inspired Designs That Calm the Mind Nature plays a powerful role in wellbeing, which is another reason why all ArtyPax ceramics are inspired by wildlife and the natural world . From owls and foxes to puffins, mushrooms and woodland creatures, painting nature-themed ceramics allows you to reconnect with the calming influence of the outdoors — even when it’s cold and dark outside. This connection to nature is especially important during winter months, when many of us spend less time outdoors. A Thoughtful Gift — Even After Christmas January is also a popular time to give: “Thinking of you” gifts Self-care presents Birthday gifts Mindfulness gifts A paint your own ceramic kit is more than a product — it’s an experience , making it ideal for anyone who could use a gentle lift during winter. Painted by ArtyPax Customer Nicola & her Grandaughter May And of course, it’s just as important to treat yourself. Make January Kinder, Slower and More Creative You don’t need a resolution that adds pressure. Sometimes, the kindest thing you can do in January is slow down, pick up a paintbrush, and enjoy the simple joy of creating something by hand. If you’re looking for a relaxing hobby, a mindfulness activity, or a screen-free way to unwind , pottery painting could be exactly what you need. Explore the ArtyPax collection of nature-inspired paint-your-own ceramic kits , designed for calm, creativity, and connection — no kiln required.
- 10 Creative Ways to Use Your Ceramic Vase After Painting It
Painting your own ceramic vase is such a joyful, mindful activity — and with ArtyPax’s nature-inspired paint your own pottery kits, you get the satisfaction of creating a beautiful piece of décor without needing a kiln. But once your vase is painted and proudly dried, you might be wondering… “What can I actually use it for?” Great question! Because ceramic bisque vases aren’t watertight (unless you use a glass insert or paint with ceramic glazes and kiln fire them), they’re best suited to non-liquid decorative uses — but luckily, there are plenty of gorgeous, creative possibilities. Here are 10 inspiring ways to use your ceramic vase in your home, as a gift, or as part of your seasonal décor. 🌼 1. Display Dried Flowers or Dried Grasses Dried botanicals are incredibly popular in UK homes right now — from pampas to lavender to eucalyptus. Your painted vase makes the perfect dried flower holder , especially when decorated with nature-inspired patterns. No water required! 🍬 2. Fill It with Candy Canes at Christmas A festive favourite! Pop a handful of candy canes into your vase for a cheerful Christmas decoration. It works beautifully on: mantelpieces festive tablescapes office desks hot chocolate stations Plus because the sweets are wrapped, your vase stays clean and display-ready. ✏️ 3. Use It as a Desk Pen Pot Your vase becomes a mini organiser for: pens pencils paintbrushes scissors craft tools Perfect for adding personality to your workspace, especially if you’ve painted it in colours that make you smile. 🌿 4. Faux Flowers & Artificial Stems If you want fresh-looking florals without them wilting or having to remember to water them. Then artificial flowers are your best friend. From realistic stems to whimsical foliage, your vase becomes a long-lasting decorative piece that never wilts. 🎨 5. A Brush Holder for Your Craft Space Your vase can be a dedicated place for: paintbrushes sculpting tools crochet hooks knitting needles (shorter ones!) A lovely reminder of your creativity every time you sit down to craft. 🕯️ 6. LED Candle or Fairy Light Holder Use your vase as a cosy ambient light by placing inside: an LED candle a string of battery-powered fairy lights LED lighting works beautifully and adds a magical glow. 🎄 7. Mini Festive Arrangement (No Water Needed) Create a simple Christmas display using: faux holly pine cones cinnamon sticks artificial berries miniature baubles Your vase becomes a seasonal centrepiece you can reuse year after year. 🪴 8. A Home for a Small Potted Plant (With Liner) Want real plants? Pop a tiny jam jar, small glass, or inner plastic pot inside your ceramic vase to safely hold water or soil. This is perfect for: small succulents baby ferns mini roses propagation cuttings Just remember: the vase itself can’t hold water — the insert does all the work. 🎁 9. Fill It as a Gift Jar Alternative Your vase makes a charming reusable gift container when filled with: wrapped chocolates tea lights herbal teas bagged bath salts beauty minis affirmation notes It’s eco-friendly, thoughtful, and extra personal because you painted it . Add an extra special touch with a ribbon & your own handwritten note for that heartfelt gift with a difference. 💍 10. A Decorative Accent for Shelves & Side Tables Sometimes the best use is simply to display it proudly . A hand painted vase can become: a pop of colour on a bookshelf a nature-themed accent in the hallway a talking point in the living room a calming, mindful object on your bedside table Handmade décor brings warmth and individuality into your home — and your finished vase is uniquely yours. 🌸 A Final Note: Using Your Vase with Water If you want to use real flowers or foliage in water, simply pop in a small jam jar, spice jar, or glass insert . This protects the paint and keeps your vase dry and safe. Plus it makes it easier to change the water. Alternatively, the vase can be glazed and kiln-fired if you have your own kiln or take it to a pottery studio — but our paint-your-own kits are designed so you don’t need a kiln to enjoy them. 🌿 Inspired By Ways To Use Your Ceramic Vase? ArtyPax ceramic vases are the perfect blend of: creativity mindfulness home décor and nature inspiration Whether you're crafting for yourself or gifting someone special, a painted vase is both beautiful and functional. Explore our collection of paint-your-own ceramics in the UK and find your next creative project today.